Documentation
Overview of the existing documentation for the Multi Step Form web application.
1. Installation
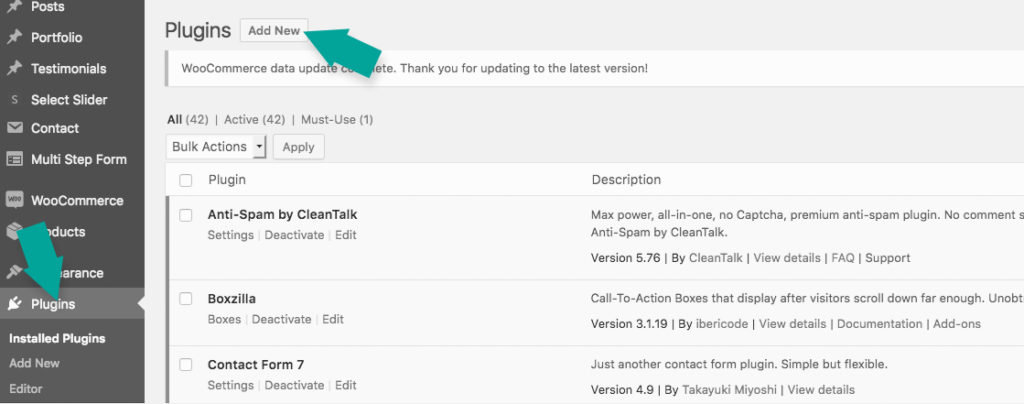
Click „Add New“ in the WordPress plugins section.
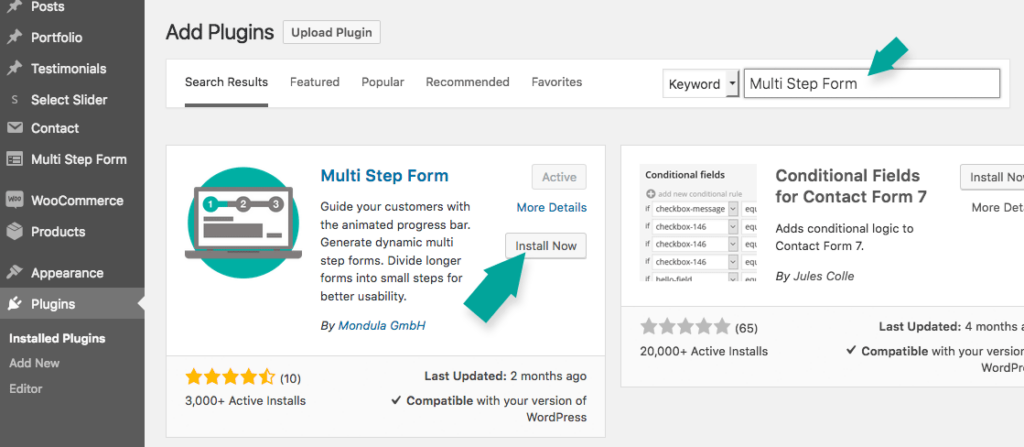
Use the search field on the right side and enter „Multi Step Form“.
2. Configuration
„EMAIL“
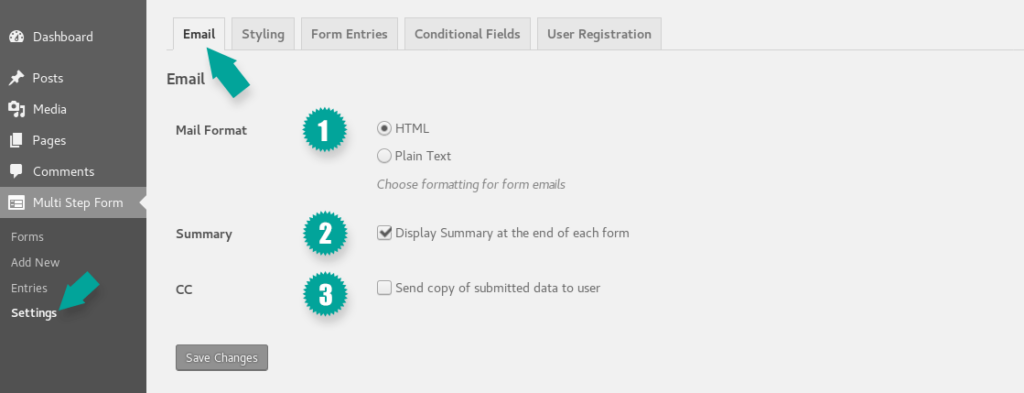
- „Mail Format“
Here you can set the format (HTML or Plain Text) of the outgoing emails. - „Summary“
If this checkbox is checked a summary will show up at the end of the form and is placed in the email. - „CC“
If this checkbox is checked the user will get a email with the submitted data.
„STYLING“
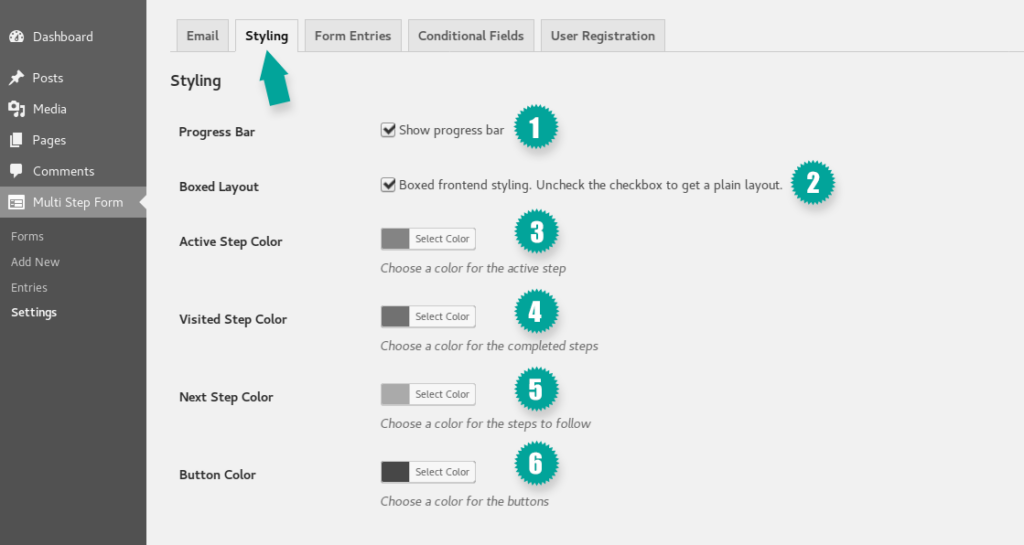
- „Progress Bar“
Turn the progress bar on or off (activated by default). - „Boxed Layout“
„Boxed Layout“ affects the content boxes in your form. If the checkbox is checked, the content boxes are displayed with a gray background color and a colored bar on the left side. The color of the bar results from the color you select in the „Active Step Color“ field. If you uncheck the checkbox here, you get a plain layout. - „Active Step Color“
The color value, which can be set in „Active Step Color“, is the primary color of the progress bar as well as the leftbar color of the content boxes. - „Visited Step Color“
The color value you can set in „Visited Step Color“ is the color in the progress bar for the already completed steps in the form. - „Next Step Color“
The color value that can be set in „Next Step Color“ is the color in the progress bar for the steps that have not yet been accomplished in the form. - „Button Color“
The color value you can set in „Button Color“ is the color of the buttons below for the forward and backward navigation.
„FORM ENTRIES“
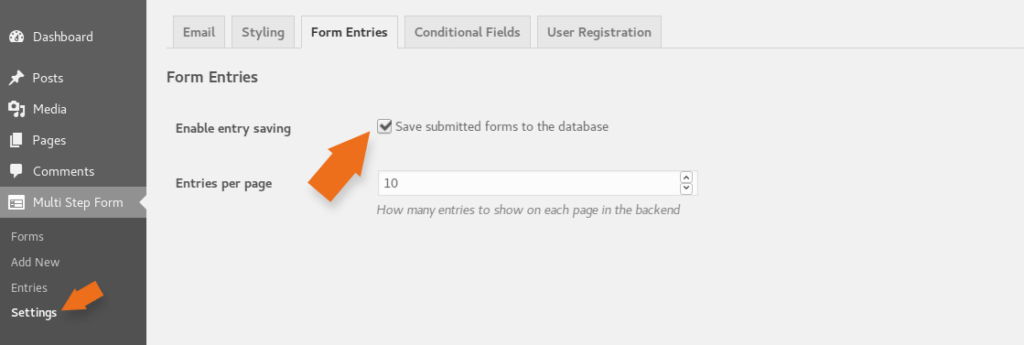
- Enable entry saving (plus)
On default the checkbox is not checked. Check it to save your form entries. - Entries per page (plus)
Here you can choose how many form entries per page will show up in the backend.
„CONDITIONAL FIELDS“

- Enable conditional blocks (plus)
On default the checkbox is not checked. Check it to activate the „conditional fields“ in your forms.
„USER REGISTRATION“

- Enable user registration (plus)
On default the checkbox is not checked. Check it to activate the „user registration“ in your forms. - Notify new users (plus)
On default the checkbox is not checked. Check it to notify new users. - Save Metadata (plus)
On default the checkbox is not checked. Check it to save the filled forms as metadata.
3. Form Creation
Go to „Multi Step Form“ > and click „Add New“.
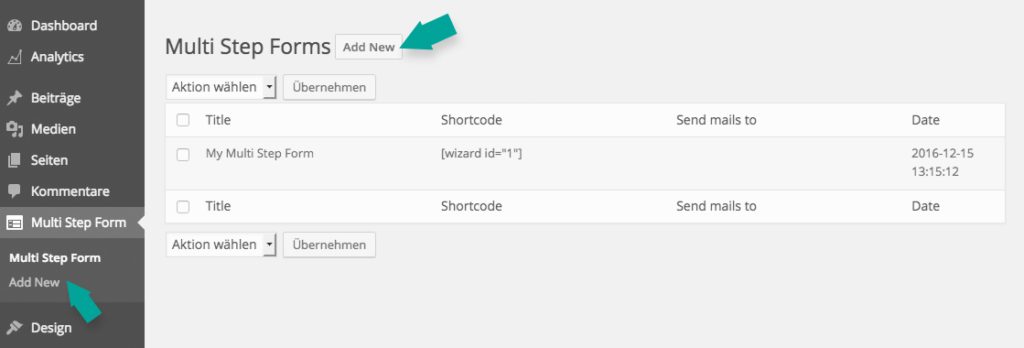
„Steps“ – Here you can define the individual steps and fields of your form. There are „Steps“, „Sections“ and „Elements“. The steps are divided into subsections (sections), which can be filled with form elements (elements).
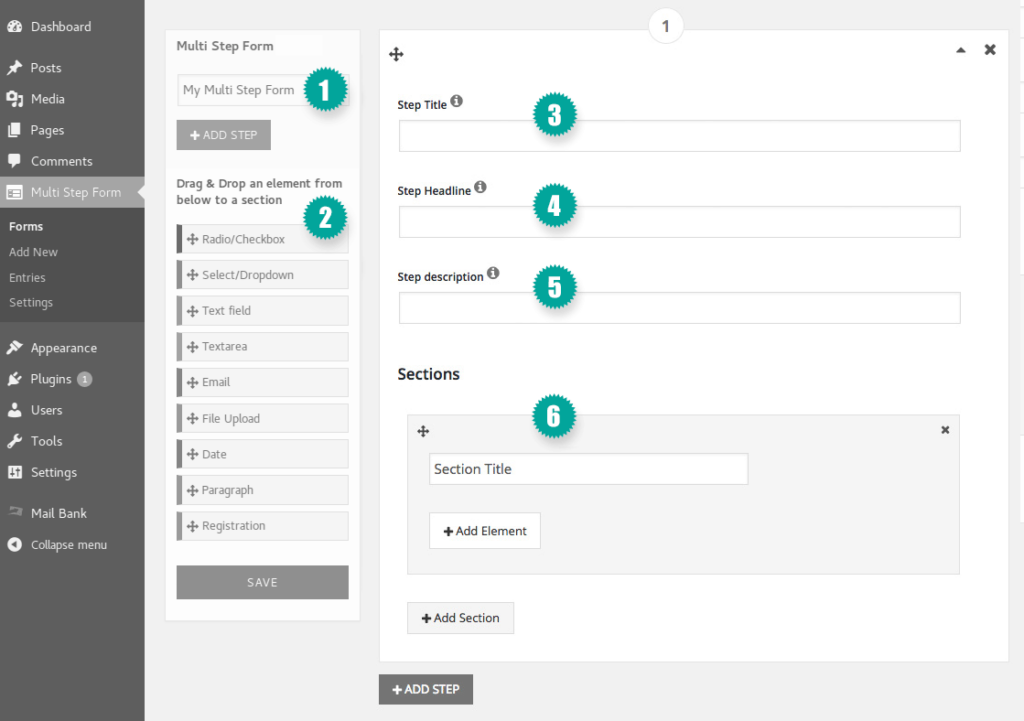
- „My Multi Step Form“
Name of the form, is only used and displayed in the backend. Use „Add Step“ to create a new step in the form. - „Elements“
The form elements you can drag & Drop in the „Sections“ on the right. - „Step Title“
Name of the step, which is displayed in the progress bar, below the number. - „Step Headline“
The heading of the form. is displayed above the progress bar. - „Step Description“
The Copytext placed below the headline. - „Sections“
The „Section“ area. The form elements are placed – either by drag & drop or with the button „Add Element“.
„Mail Settings“
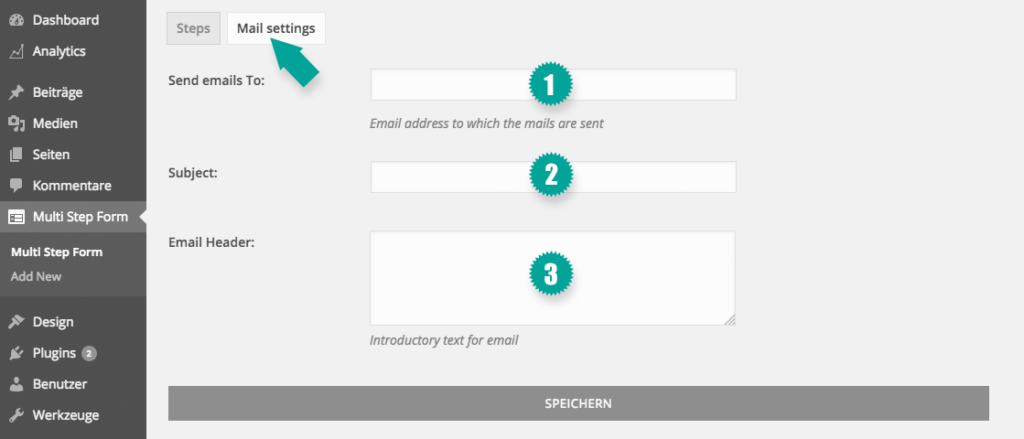
- „Send mails to“
Enter the recipient of the send email here. - „Subject“
Enter the subject line of the email here. - „Email Header“
If need be you can write a introduction text which is displayed above the output of your form.
You can also import form’s via JSON import. To allow JSON upload within your WordPress add „define( ‚ALLOW_UNFILTERED_UPLOADS‘, true );“ to your wp-config.php.
4. Conditional Fields
Go to „Multi Step Form“ > „Settings“ > „Conditional Fields“.
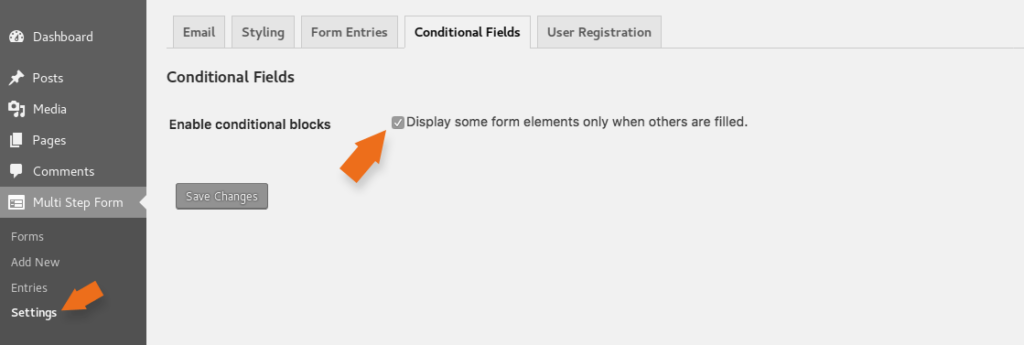
- Enable conditional blocks (plus)
On default the checkbox is not checked, please make sure to set the marker here to activate the “conditional fields” in your form.
This is a simple example how „conditional fields“ can be used.
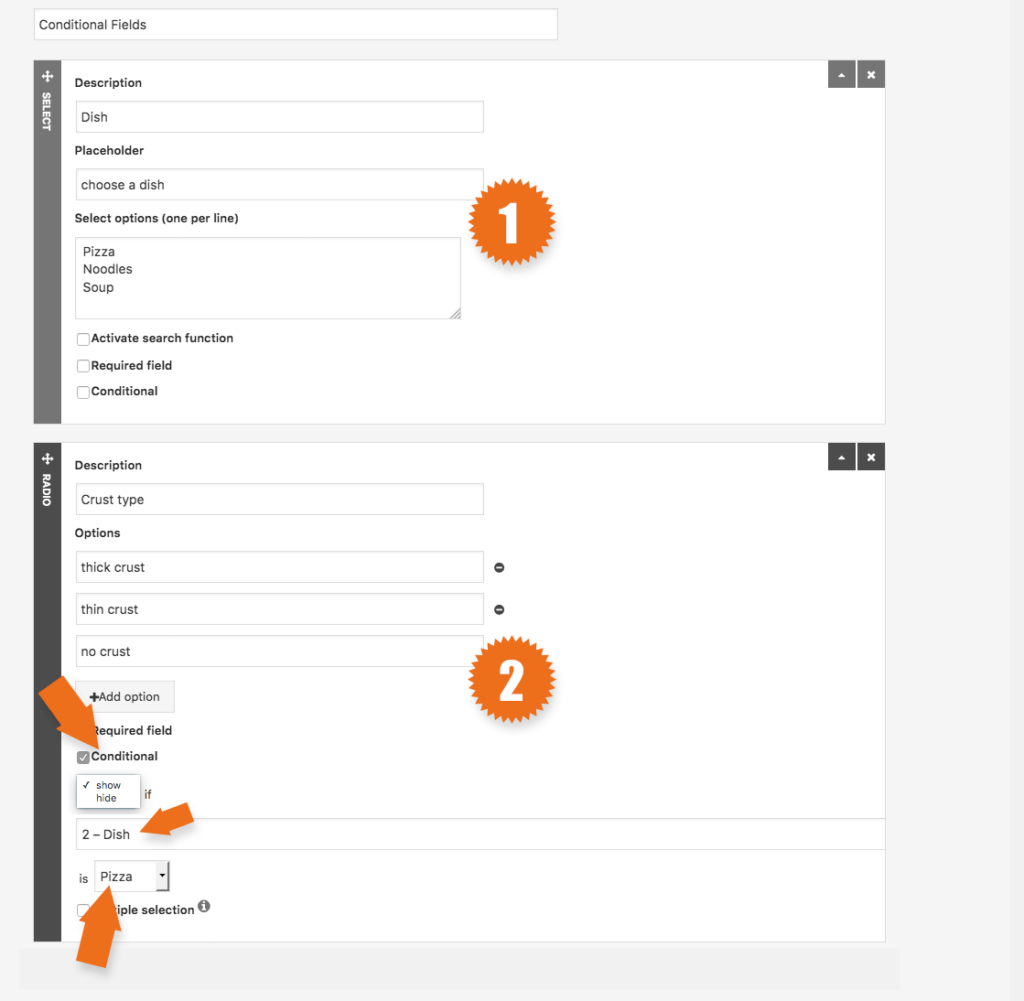
- Choose a (dish) (plus)
This Form Element (Dish) includes the prerequisite (pizza) for the conditions below. - If (dish) is (pizza) show (crust type) (plus)
This Form Element (Crust type) is hidden on default. Only if the customer chooses (pizza) in the Form Element (dish) above, it will show up and the user can choose the (Crust type).
5. Form Entries
Go to „Multi Step Form“ > „Settings“ > „Form Entries“.
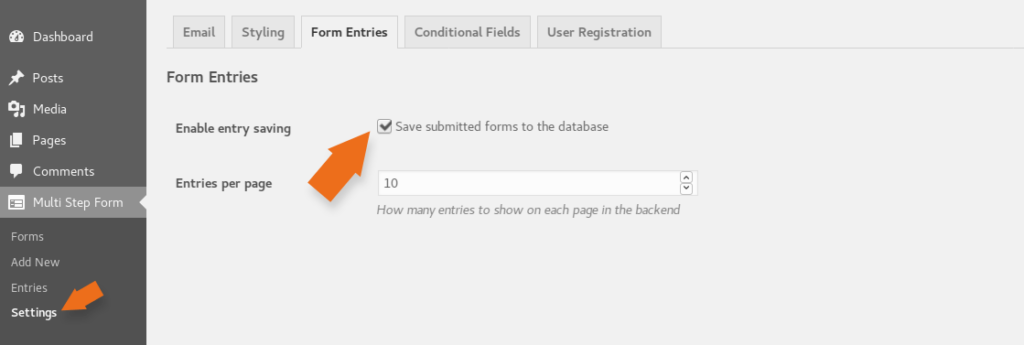
- Enable entry saving (plus)
On default the checkbox is not checked, please make sure to set the marker here to save your form entries.
Go to „Multi Step Form“ > „Entries“.
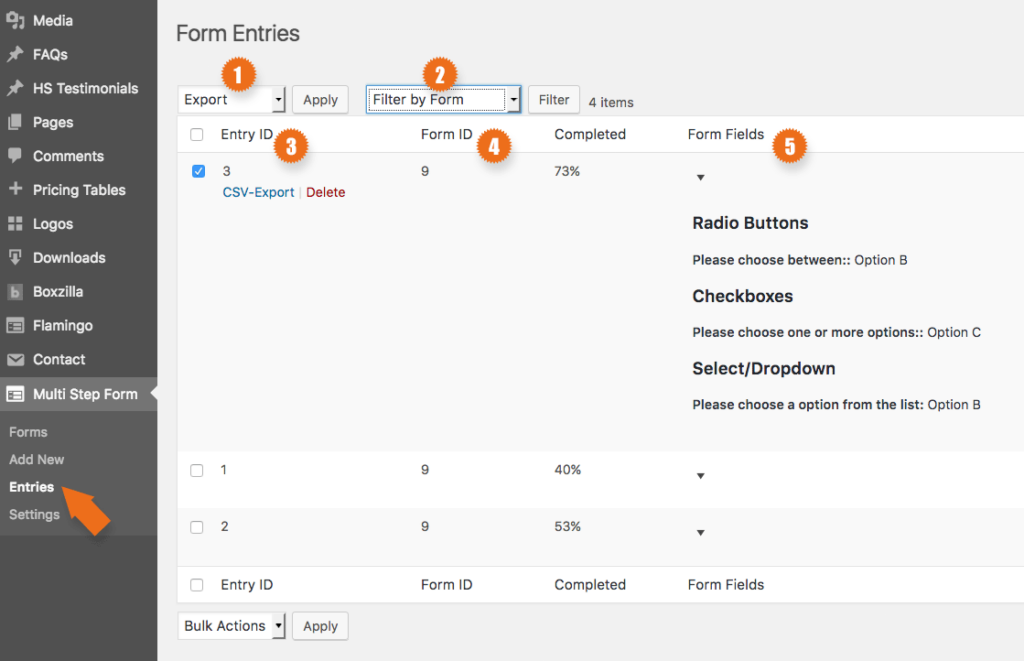
- Export (plus)
Choose „Export“ and click „Apply“ to export forms as csv – to use the Bulk Action-Export you have filter your entries by a specific form. - Filter by form (plus)
You can filter forms by „free version“ and „plus version“. - Entry ID (plus)
Every entry has an individual ID. - Form ID (plus)
Every form you create has an individual ID. - Form Fields (plus)
You can see a summary of an entry by clicking the arrow.
6. Integration of the form
Go to „Multi Step Form“ > and copy the shortcode.

Open the desired page/post and insert the shortcode there. Now the Multi Step Form is integrated and will be displayed.

| Type | Name | |
|---|---|---|
| LINK | Multi Step Form Documentation |
